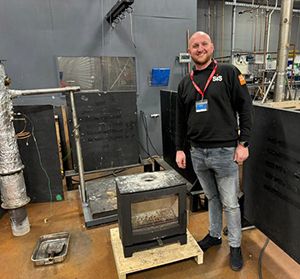
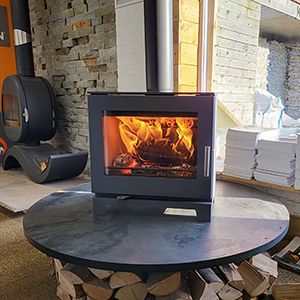
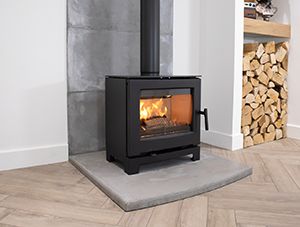
Sam Hamer, owner of Stove Industry Supplies, describes his journey so far in the stove industry and the process of making his own stove: The Basset 5.
The Spark
I’ve been around stoves my whole life, fitting them, servicing them, selling the parts, and listening to the same moans we all have about how awkward some are to install or strip down.
My Dad ran The Heat Resistant Glass Company, supplying glass and parts to the trade long before I was old enough to know what a stove was. He even went on to design his own range Firestorm Stoves which some of you might remember.
From playing with Lego in the warehouse as a child, I moved onto picking and packing boxes, cutting glass, working in the office, installing stoves, and even welding and fabricating them. Later, I went out on the road as a rep, getting his stoves to market, and I’ve never left the trade since.
These days I own Stove Industry Supplies, which has grown into one of the UK’s largest stove parts businesses. We’ve also got a HETAS-approved training centre, a retail showroom, and I still keep my hand in as a registered installer and sweep, getting out when I can with our installation teams.
I’ve seen this industry from every angle. I know the same challenges and wins you do, and that experience is what’s shaped the way the Hamer Fires brand has been built.
The idea for the Basset 5 started like most good ideas, over a brew, talking shop. Me, my dad, and Dave, our head fitter, were chatting about stoves and what we seemed to be fitting the most of. I joked, “Why don’t we just make one?” My dad looked at me and said, “Well, what are you waiting for?”
That was it the moment the idea stuck. Every fitter and stove shop owner has probably said the same thing at some point: “If I made my own, I’d fix this, change that, and make it easier to fit and service.” Because half the time, you’re standing there thinking, “Who designs these things? They’re a pain in the arse.”
So that’s exactly what I set out to do, make a stove built from real-world experience, shaped by the frustrations we’ve all had.
The Challenge
Four weeks later, the prototype drawings were done, and we were ready to start the journey. Two weeks after that, the first prototype was in production. Seeing that first stove made, and getting it flued up and burning I thought, “We’ve cracked it.”
Well… not quite.
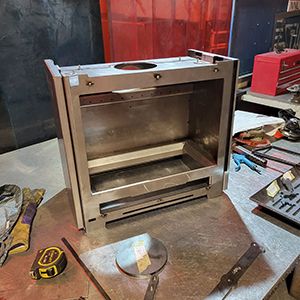
That’s when the real fun and frustration began. I started tinkering, making small changes, testing them, and watching how they affected the burn. I’d be stood there with the flue gas analyser, checking readings, swapping parts, trying different ideas to see what actually made a difference.
I began experimenting with vermiculite baffles cutting, shaping, and even gluing them together in different ways to see how the gases moved. That bit of playing around ended up creating something unexpected it led to Firebrick Superglue, a product we now sell today as a brick repair sealant.
The baffle experiments solved one problem, but then my attention turned to something bigger, filtering the flue gases them selves. That’s when I really went down the rabbit hole.
Most stoves use simple steel plate baffles. They do the job, but once they’ve been through a few burns, they’re awkward to remove warped, tight, and often stuck solid. I wanted something better.
The goal was simple: create a system that helped the stove burn cleaner and more efficiently, but still be practical to install and service. I started sketching ideas that worked more like a catalytic converter something that didn’t just deflect the gases, but made them work harder before they left the stove.
The first version used layers of fine stainless mesh sewn together and held in a frame. It worked well at first, but after a few burns the mesh became brittle and started breaking down. I knew straightaway that if I released it like that, I’d never hear the end of it from other sweeps so that idea was binned.
Next, I tried ceramic coatings. They looked good on paper, but they were a nightmare to apply, I had to bake them onto the secondary baffle. And after a few tests, they started flaking off. Another one scrapped.
Each failed idea led to something new though, and after about four more versions and a lot of trial and error we finally landed on what’s now the CleanFlow™ Flue Cage: three layers of offset stainless steel that heat up quickly and help burn off more particulates as the gases pass through.
Of course, I knew straight away what every fitter’s first thought would be: “That’s bolted what happens if the bolts seize?” It’s the kind of thing that drives me mad too. So we built it using spacer bolts the cage bolts into the spacers, not directly into the body. That means even if something does seize, you’ve still got two ways to get it apart. Once the CleanFlow™ system was sorted, the next focus was making the inside of the stove as easy as possible to strip down and service.
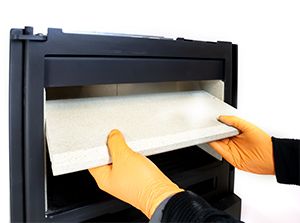
There’s nothing worse than a stove where you have to strip half the firebox just to get the baffle out twist it sideways, hold it up with your hands wedged inside the firebox, try to shuffle out of the way to pull bricks or parts out, all while balancing it there. And then on top of that, you’ve got to remove every brick first. Basically, you end up dismantling the whole inside just to take out one part. It’s painful.
The side bricks sit tight to the stove body, but at the top rear, just above the tertiary bar, there’s a small gap to get your fingers in and pop them out cleanly. The back bricks then come out with ease.
The log retainer lifts straight out too, just tilt it forward and lift. It can’t go back in the wrong way either, which stops that all-too-common mistake you see when servicing other stoves.
Even the ashpan’s been thought through. There’s a fold down the middle that creates an air gap, reducing heat transfer to the stove base while also strengthening the ashpan. When you slide it back in, it drops neatly into position with a satisfying fit, no rattles or awkward adjustments.
And the grate? Same story. Once you remove the ashpan, just slide your fingers underneath and lift it up. The side walls are angled at 45°,so it never wedges itself tight after a season of burns. It just lifts straight out, simple.
All these little things might seem small on paper, but they’re the details that make a difference when you’re on-site, mid-service, or showing a customer how the stove goes together.
A detail that’s made a huge difference during installs is the levelling system. Instead of the usual M8 bolts that seize up and get covered in weld spatter, the Basset sits on 30 mm adjustable rubber feet fitted after painting, so they’re clean and easy to turn. They stop the stove sliding on polished hearths and make levelling simple, even on uneven stone hearths. So why is this not already a thing on stoves? … cost, it cost £10.00 per stove, I’ll just factor it in its worth it.
I turned my attention to another job that can sometimes been a pain, fitting the flue collar.
On most stoves, the collar fits from the top. So you end up sealing up the vitreous pipe and collar together, getting the stove onto skids, leaving a few millimetres of gap to slide it into position, then removing the skids and re-centering the stove again, all while trying not to scratch or damage the hearth. It works, but it’s awkward and fiddly.
So I flipped the idea completely. On the Basset 5, the flue collar fits from the inside up. That means you can position the stove exactly where you want it first, get it level using the rubber feet, and then fit the collar from inside the stove.
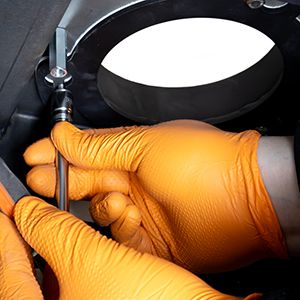
Depending on the space, you can either drop the vitreous pipe straight down into the stove before positioning, or angle it in afterwards, both ways work. Once it’s in place, the collar has keyhole fixings, so you can twist it into position and tighten the bolts easily .
It’s one of those little changes that installers really appreciate, the kind of job that’s now made simple and solid.
During testing, I noticed the air wash was stronger down the sides of the glass than in the middle. That’s because the air feeds in from the top sides within the firebox, so naturally it was favouring the outer edges. The result was a strip down the centre that wasn’t getting the same flow of air, and that really bugged me.
To start fixing it, I had to keep cutting out the air wash and reworking it to test small changes. That’s where the idea of making it removable came from it made development easier, and it made sense to keep it that way for servicing too.
Through that testing, the air wash equalizer was developed, a small but important change that balances the flow evenly across the whole width of the glass. You can see the difference straight away: when you first light it, the condensation clears evenly from side to side, and if you test it with a smoke pellet, the airflow is perfectly consistent. You’ll notice this now on other stoves once you’ve seen it, you can’t miss it.
Once the burn and airflow were dialed in, I turned my attention to the details that installers and showroom staff really notice the parts you touch, see, and use every day.
First was the handle. When I’m selling a stove in my showroom, I’m always stood next to the side of it, talking to the customer. I’ve always hated seeing an ugly weld where the handle attaches, it stands out straight away to me. I know it’s easier and cheaper to do it that way, but when you’re selling a £1,800 stove, its the little details that matter.
On the Basset 5, the handle is fully machined, so there’s no weld on show. It looks clean, feels right, and gives that sense of quality when someone’s stood in front of it. And now I’ve said it, I bet you won’t be able to unsee those welded handles on other stoves again.
The hinge pins are fixed in place on the doors hinge and have a chamfered edge, which makes refitting the door much easier. No loose pins dropping out, no fighting to line things up, it just locates straight in.
The air control was one of the trickiest parts to get right. I wanted that positive click feel something solid and repeatable but it took a lot of trial and error to nail it.
We started off using a strip of spring steel that pressed against a raised notch every time you moved the arm, giving that located feel. In theory it worked, but in reality it was a pain, inconsistent, fiddly, and just not smooth enough.
That led us to the system we have now. It took a lot design tweaks to make sure the feel was identical on every stove, but we got there. The result is a clean, precise control that moves smoothly with a satisfying click in each position and the same feel on every single Basset.
The side convection panels are another example of keeping things practical. They’re there for a reason, to help push more heat into the room but I wanted them designed for simplicity too. If one ever needs removing, you just lift the lid, undo a single nut, and slide the panel up and off. Each one has locating tabs that can be gently bent by hand to realign it if needed. It’s quick, tidy, and installer-friendly.
I don’t know what it is, but we all love that moment when a stove’s running perfectly, when you’ve got it going strong, then drop it right down and watch the flames dance around the firebox. The little bursts of flames, the jets rolling out off the tertiary it’s mesmerising.
That’s what I wanted with the Basset: not just a clean burn, but a controllable, balanced one. It burns hot, steady, and clean, with a beautiful flame picture that never feels choked or lazy. It’s that “fire telly” moment the bit every installer, retailer, and customer learns to loves.
With the airflow and detailing finally right, all that was left was the final piece, the door. I never imagined that would turn out to be the hardest part of all.
The Door Saga
So now came what I never thought would be the hardest part of the build, and what’s honestly been the bane of my life for the last eight to ten months: the door.
Having worked with a cast iron foundry in Europe for over six years, I thought this bit would be straightforward. We’ve had replacement parts made for loads of stoves before, so I assumed it’d be the same process, draw it up, get the tooling made, and off we go.
We designed the door, checked every tolerance, and on CAD, everything looked perfect, everything lined up, everything worked. So we signed it off, got the mould made, and ordered some sample castings.
While that was underway, I got on with prototype body number four, making all the final tweaks ready for what should’ve been the first final production ready stove.
Six weeks later, the first sample door arrived. At first glance, it looked great, clean lines, everything fitted just as it should. Then we painted it, and that’s when the problems showed up.
Under the paint, you could see small blemishes on the face and casting flow marks across the surface. Nightmare.
I went back to the foundry with all the issues to get them sorted, and four weeks later, two new samples arrived. One was okay, just about passable, but the other was perfect. Smooth, sharp, clean. Finally, I thought, we’ve cracked it.
So we got door on and the stove ready for testing at KIWA. It passed without a hitch, everything looked good. Time to get moving. We ordered 100 doors, 100 bodies into production, and started slowly spreading the word about our new stove.
A few weeks later, the shipment of 100 doors landed. I couldn’t wait to open them, it finally felt like everything was coming together. But as soon as we started unpacking, I knew something was off.
The first few looked fine, then I spotted it, the same blemishes and flow marks we’d already fixed. Not as bad, but still there. My stomach dropped. I checked more, and it was clear: some were perfect, some were rough, some had visible casting ripples again.
The foundry said, “We’ll fix it.” I said, “Right, no problem. Make 50 doors, and I’m coming out to see you.”
Three weeks later, after two plane trips, I was stood in the foundry going through every detail what’s acceptable, what’s not, what we’re willing to sign off. We nailed everything down properly this time, and I’ve got to say, I also had some of the best food of my life while I was there.
Happy days — we were back on track.
Another 100 doors arrived and I thought, finally, we’re back on track. The bodies were still being built, the dealers were lined up, and it felt like everything was about to become real.
I cut open the pallet, lifted the first door, and my heart sank. Same problem. The blemishes and ripples were back again. It was like dé jà vu, the nightmare all over again.
And this time, it wasn’t just frustrating, it was expensive. The stove bodies were already made, orders were waiting, and big bills were starting to loom. We were so close to launching, but I couldn’t puta product out to market that wasn’t right. You only get one chance to make an impression.
Luckily, around that time, I’d just become a member of the Stove Industry Alliance. We had our first meeting in Bristol, and the night before I went out for a meal with a few of the other members. By pure chance, I ended up chatting with the team from Thomas Dudley Foundry.
We got talking about what I’d been working on, and I explained the problems I’d been having with the castings. A few days later, they came up to see me in person, took one look at the doors, and completely understood what had been going wrong.
To be fair to them, they’ve been outstanding. They helped me get out of a real hole, the new mould was made quickly, the samples were pushed through, and the finish is even better than I imagined. Before long, the first a new batch of 100 doors were finally ordered.
What happened to the bad batch of doors nearly all 200 of them? well, yeah, they got scrapped.
It’s been a long road getting to this point, more problems, testing, and sleepless nights than I ever imagined when I first said, “Let’s just make our own stove.” But now, standing here with these final doors in front of me, it finally feels like the Basset 5 is ready to go out into the world.
Every single component on the Basset 5 can be serviced or replaced without special tools. Nothing’s hidden, nothing’s welded where it shouldn’t be, it’s all been built properly, with future maintenance in mind. A stove made by someone who actually has to take them apart.
I hope you’ve enjoyed reading my journey so far.
and we’ll get back to you with all the details and pricing.